Introduction
In 2012 I bought the three HP ZR2440w monitors because I was playing EVE Online and wanted the additional screen real estate. This was a terrible decision because powering that many pixels forces most gamers into buying multiple video cards easily jumping past $500. I somehow managed to persevere and make it work with a single $250 Radeon 6950 in a semi-acceptable manner until 2015 when I started playing Tomb Raider. At this point my PC barely chugged along at sub-30 frames per second and I started to get a serious case of the upgrade itch.
The absolute breaking point for me was the upcoming 2015 release of the Witcher 3 game where I knew that I wanted to play that at 60 frames per second. My 6950 was clearly past its prime so I ended up purchasing two $250 Powercolor PCS+ R9 290s which can handle 4K resolutions and therefore handle the Eyefinity 5760x3600 resolution. After a few weeks of research and a power supply upgrade the two cards finally arrived and amazed me with their performance. They powered through the games; spewing out a constantly high frame rate but at the same time crazy amounts of noise as the fans whining away to deal with the temperatures.
Unlike the cost that I was willing to sacrifice on, the noise that the 290s put out was something I absolutely did not want to compromise on. In the past I had an interest in water cooling due to how it could make a PC more quiet but I was always put off by the price tag. I did know that it was quite effective from my experience of using a $50 Zalman LQ320 water cooling AIO kit built for water cooling a CPU. I had modded it to fit on my Radeon 6950 by performing the “Red Mod” resulting in near complete silence during gaming that I quickly grew accustomed to.
The noise that the two R9 290s were generating was already too loud for my standards and that was in the winter with low ambient temperatures. I knew that any noise that I was experiencing now was only going to get worse come summer. This is when I started seriously investigating how to water cool my PC and discovered a large community of helpful enthusiasts and hobbyists who helped me do my research, build a loop, and therefore write this blog entry.
How to blow your budget water cooling your PC
1) Pick a budget
Your budget is tied to how many components you want to water cool. Take a look at the table below and decide what you need.
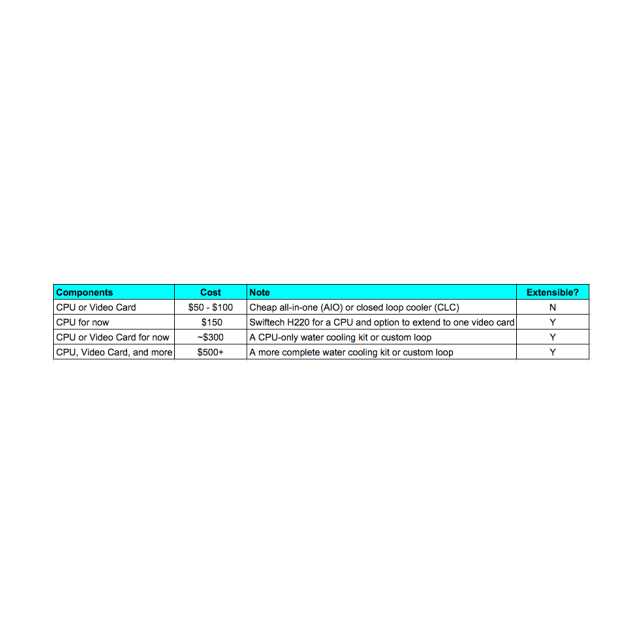
The cheapest and easiest solution is always to go with the AIO/CLC coolers and several people have used them together to cool a CPU and multiple video cards via mods (like the “Red Mod”) or products like the NZXT Kraken G10 or Corsair HG10. Some manufacturers even have AIO and CLC coolers that are specifically designed for video cards like the ARCTIC Accelero Hybrid II. If your budget is here then be happy you are able to stay in your budget. (Reading further beyond this point will probably make you bust your budget!)
The next option is buying a Swifttech H220 which strikes a nice balance by being the most flexible AIO/CLC water cooler since it allows itself to be extended to support cooling a video card as well. It is a good halfway point if you’re toying with the idea but aren’t entirely commited yet.
After that, the price and amount of work required in buying and maintaining a build goes up substantially depending on which components you want to water cool but the solutions boil down to two decisions: you essentially have to decide between a kit ($$) and an entirely custom loop ($$$). I decided to go down this route and I’ll share what I learned in the next step below.
2) Expect to blow your budget
I initially picked a budget of $300 and started researching on ways to save money when building a loop. This resulted in me looking at a lot of kits from various manufacturers where I learned that kits have the benefit of having everything provided in a neat package with a lower cost.
However, the problem with using a kit is that you’ll be forced to use only one manufacturer. There isn’t a single manufacturer out there that builds all necessary water cooling components at the highest quality standards. Some companies are better at CPU blocks (EK), others at radiators (Alphacool), and some at fittings (Bitspower). This was this reason that caused me to eventually decided against kits because I wanted quality components at a reasonable price.
That being said, if you’re not concerned with having the best of the best then a kit is still great value for your money. Take a look at these tips if you do manage to identify a kit as your ideal solution within your budget:
- Bay reservoirs are loud because they’re close to the front of the case and cause vibrations and noise. If you want a quiet PC you’ll want to avoid these.
- The pump in budget kits is usually not powerful enough for an expanded loop. If you want to expand your loop later on you might as well buy a good one (DDC or D5) and forgo the kit in the beginning.
- The barbs you get with kits is often questionable in quality so make sure you do a good leak test.
- Kits from Raystorm, EK, and Alphacool that are reasonably priced and seemed fine when I was researching them.
3) Research water cooling
At this point I realized that I wasn’t willing to spend $300 on my budget and had to raise it to at least $750 since I wanted to water cool my CPU and two video cards.
I ended up trying to find a good source of material to research and discovered that Reddit and Youtube have a great wealth of information. If you’re interested in water cooling make sure you read everything on /r/watercooling and watch a ton of Youtube videos. I’ve summarized most of what I learned here but I still urge you to read the above material.
Some Basics
All components such as radiators, blocks, and fittings are usually made of some metal. Bronze, copper, and nickel are fine to mix in the same loop. Similarly, acetal is plastic so it is okay to mix with anything. However, NEVER mix aluminum with other metals or you will get immediate corrosion and destroy your components. This is also why you shouldn’t hack up most AIO/CLC kits and extend them because a lot of them have aluminum radiators.
G1/4″ is a standard threading on most water cooling components excluding some pumps. There seem to be a lot of D5 pump tops that remove the standard top and add the G1/4″ top. Also, EK mentioned that only their fittings should be used on their products but my Barrow fittings worked just fine on both their blocks and my Alphacool radiators.
Check here and here for some other basics but I’ll cover the rest in the sections below.
Case ($100 - $300)
The case is where you should start your build. If you already own a case then identify how many radiator mounts you can attach onto it and measure out how much headroom you have for your radiators and fans. Write all this information down because you’ll need it later during the planning phase. Search on /r/watercooling and the internet to see if anyone else has managed to water cool that case before. Examples are extremely useful because they’ll help you visual your loop later on.
I owned a Corsair 650D and found several examples of people who had managed to mod it for water cooling. Unfortunately, what they didn’t have was the need to cool two R9 290s which left me requiring a different case that had the necessary radiator cooling overhead.
I ended up deciding on buying the Enthoo Luxe over the Enthoo Pro for my needs because it could handle thicker radiators and still give me plenty of room to work in. For those who demand the best the Enthoo Primo is probably the best solution on the market right now.
Radiators ($50 - $200 per radiator)
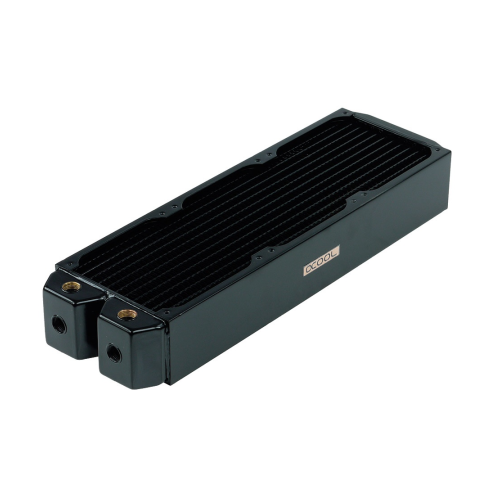
You roughly need 1.5 times 120mm of radiator per component that you want to water cool and have your PC be more quiet than an air cooled solution. If you want whisper quiet PC then people recommend 240mm per component. This meant that for a CPU and two video cards I needed somewhere between 540mm and 720mm of water cooling to make my PC quiet.
Radiators are pretty simple in the sense that you generally want to have as much radiator length in your PC that you can since it increases the total surface area. Radiator thickness is another issue that you can consider but generally slim radiators perform worse than thick radiators.
I ended up choosing some thick Alphacool UT60′s for my purposes (240mm + 420mm = 660mm) since I knew I was going with a low RPM build and they did well on Martin’s review. It should also be mentioned that the EK Coolstream XTX and Hadware Labs SR2 line of radiators were highly recommended by redditors and other reviews.
I would recommend this resource for anyone interested in comparing radiators
Pump and Reservoir (~$80 per pump and ~$100 per reservoir)
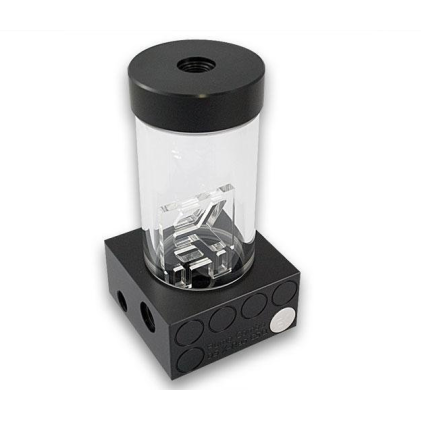
Get a DDC or D5 pump and you won’t go wrong. D5 pumps are the best in the industry and one is usually enough for a CPU block and a few video cards. If you start adding more components you might want to consider an additional pump. Some people also run two pumps in serial to help agains the restriction or to prevent catastrophic failure in in case one fails.
Both DDC and D5 pumps are made by a 3rd party company and rebranded to all major water cooling manufacturers so there isn’t much difference between them. A lot of manufacturers sell different “pump tops” which have a different aesthetic appeal or alter the location of the ports.
I ended up getting an EK-D5 Vario XRES 140 because it included the reservoir for a reasonable price. In hindsight, this limited my options for pump and reservoir placement and I wouldn’t have done it again. If I were to do it again I would have bought a separate EK or Phobya reservoir and the cheapest D5 pump I could find at the time.
CPU Blocks ($50 - $100)
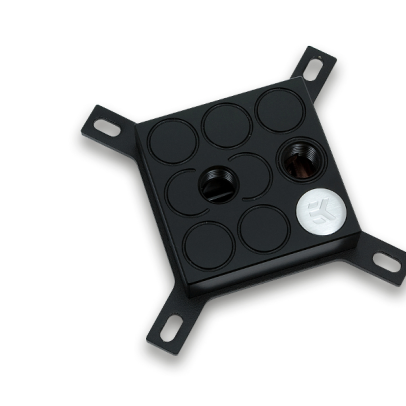
EK has a reputation for creating the best blocks in the industry. I was considering the Raystorm previously due to price but it really boiled down to preference. If you prefer other blocks they should work as well but the one thing you should check is to see if they’re compatible with your CPU socket. If they are, then you’ll be fine.
In the end, I picked the EK Supremacy line of CPU blocks due to this glowing review and the fact that I was forced to use EK VGA blocks and I wanted a semi-matching build.
VGA Blocks ($50 - $150 for a block)
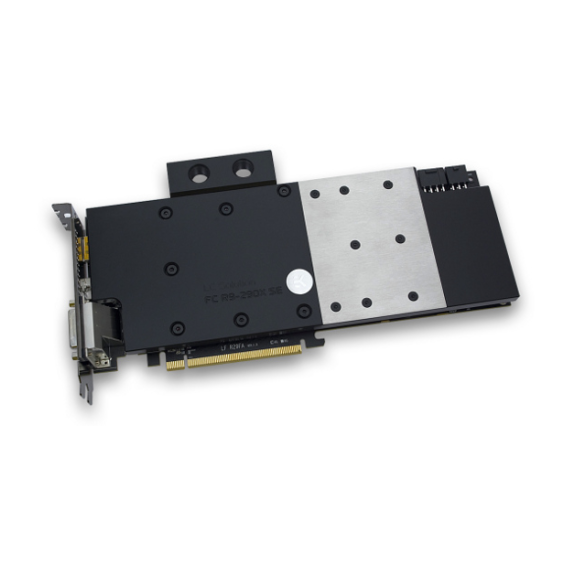
Similar to CPU blocks you need to make sure that a VGA block is compatible with your video card. However, unlike CPU blocks you don’t check compatibility via a socket but rather via the PCB version where the “reference PCB” is king.
A reference PCB is a standard PCB that nVidia or AMD initially release a video card with. If you don’t have a reference PCB then you might not get your $100 VGA block to fit correctly and end up damaging your video card.
You also have the option of choosing a full VGA block or a partial block. The full block allows the entire card to be cooled but is extremely tied to the VGA card. If you go with the partial block then you can move the block between most video cards but you’ll end up having to passively cool the other parts of the card with a heatsink and fan.
I was limited to using EK blocks for my video cards because they did not have the reference PCB and I knew I wanted a full VGA block. Luckily, by using the EK Cooling Configurator I was able to find a compatible block in Acetal+Nickel. Another VGA block manufacturer that I considered was Alphacool but they were only compatible with reference PCBs so I couldn’t use them.
Fans
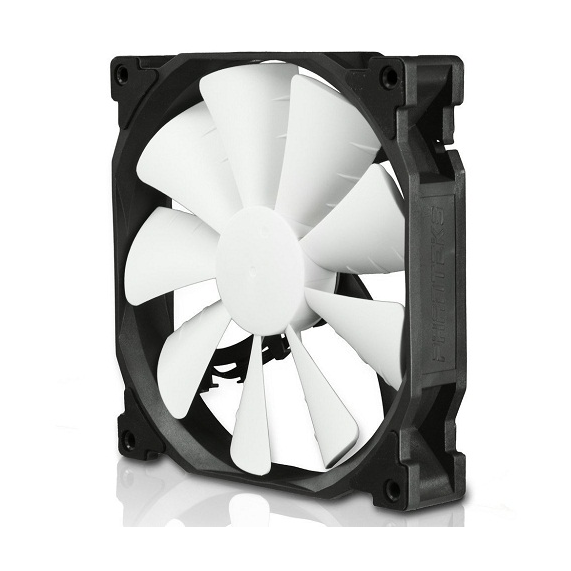
Everyone on the internet says that Noctua fans are the best in the industry and they’re right for the most part. I would love to buy 120mm Noctua’s but didn’t want to use them for two reasons: 1) they’re super expensive and 2) when they reach 140mm their static pressure and therefore effectiveness immediately drops.
This happens because of fan dynamics and the fight between static pressure and CFM (cubic feet per minute). A fan can be optimized in both ways but when it comes to radiators static pressure is what wins. The larger a fan gets the harder it is also to keep its static pressure numbers up and Noctua’s are generally optimizing on CFM.
Luckily, Enthoo makes a great 140mm fan that is reasonably priced which you can see here and here. I ended up buying their 140mm fans for my 420mm radiator and reusing my Corsair SP120s for the 240mm radiator.
Tubing

Tubing is another extremely important decision that everyone has to make. It isn’t recommended for beginners to choose hard tubing so I ended up buying Primochill Advanced LRT soft tubing because it has no plasticizer. Plasticizer is a goey plastic that can leach itself out of tubing and gunk up your components which is extremely difficult to remove. It’s best to purchase quality tubing to avoid this problem.
Tubing also comes in various diameters where there is an outer and inner diameter. If you imagine starting at the tubing from the top down you’ll see the following diagram:
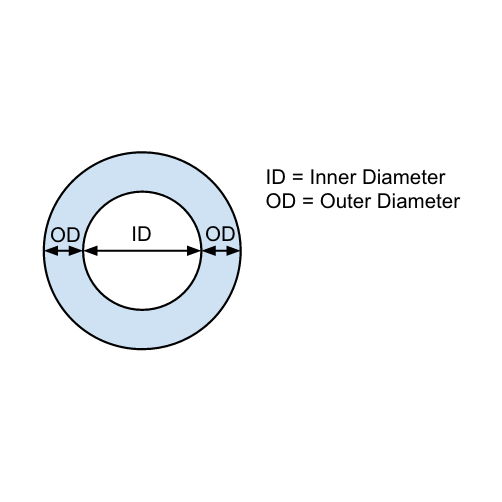
I ended up buying tubing of style 3/8" - ½" (tubes with 10mm (3/8") internal diameter and 13mm (½") outer diameter) because it was one of more popular kinds of tubing and there are a lot of fittings at a reasonable price available for it. The other popular type of tubing is 3/8" - 5/8" tubing which has a larger outer diameter and is therefore less likely to kink in builds.
There are many other types available in addition to these two but they’re rarer and therefore the fittings cost more.
Also, always buy more tubing that you expect to use in case of mistakes or to help you fill your reservoir during the filling stage.
Fittings
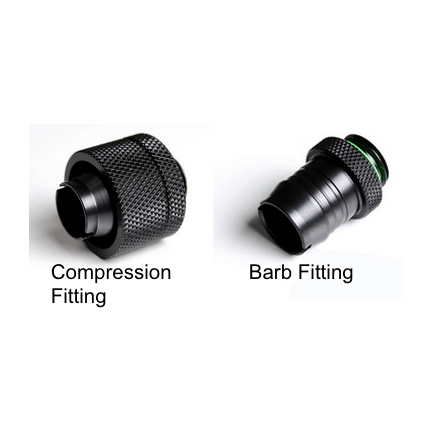
Fittings come as either barb fittings or compression fittings. Barb fittings are significantly cheaper but are more of a pain to remove from the build. Compression fittings are recommended and are the modern variation of barb fittings similar to how people prefer to use thumb screws.
The number one thing to remember when buying fittings is that they need to be compatible with your tubing. If you buy tubing of 3/8 ID and ½ OD then you need to buy fittings of the same kind or they won’t fit together.
Most people recommend Barrow fittings (Bitspower OEM) that you can get on aliexpress.com for super cheap. I personally bought them and love them. I would recommend you get a few extra fittings of each type (angle, straight, 45 degree) just in case.
I would also highly recommend that you buy a “T” fitting, extender, and valve fitting to act as a drain port at the lowest part of your loop. I first went without this but have since added it since it makes maintaining a loop worthwhile the extra $30.
Fluid
I decided to go with distilled water from my local super market. Some people prefer colorful nano-fluids but distilled water is safe, non-toxic, and cheap. A lot of manufacturers specifically mention that their products will break with a non-certified biocide and therefore request you buy their fluids. I ended up ignoring this logic and going with distilled since it is highly recommended in the community.
Biocide
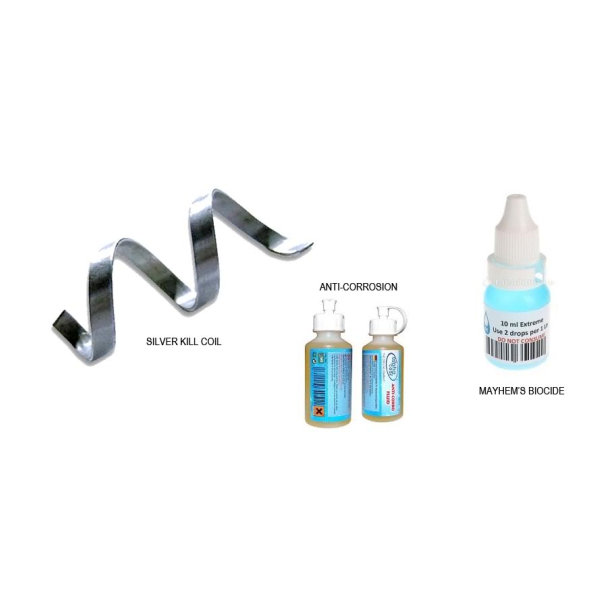
If you go with distilled water then you’re going to need a biocide to prevent algae from growing in your loop. There are essentially two solutions on the market with one being a silver kill coil and the other being PT Nuke. I ended up going with PT Nuke since I heard some horror stories about silver kill coils stripping the nickel from EK blocks.
Accessories
There are many little accessories that you should buy as well. Definitely invest in a ATX jump start connector, a good tube cutter, and a funnel that will fit in your tubing for filling your loop.
Other accessories such as flow meters or thermometers for your water temperature aren’t necessary but can add some “fun” factor to your build.
4) Loop planning
At this point you should have a reasonable idea of what is available and what blocks, radiators, and other components that you want. If you have any questions you can write a [Build Help] post in reddit (like mine) to get more information from the community.
That being said, you’re only getting started if you’ve made it to this point. The next major step is to plan out your loop and figure out if everything will fit where you expect. Finding examples of people’s builds in the same case is very useful as it’ll help you visualize your own build.
Sit down and plan out your loop. You don’t need to worry so much about which components feeds to what in what order with the exception of the reservoir and pump. The reservoir always has to feed directly into the pump to keep the pump wet and prevent it from dying.
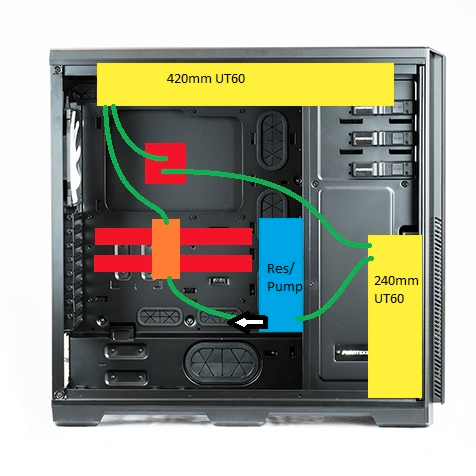
As your loop runs all the water in the loop will eventually reach the same temperature. It is perfectly fine to therefore have your GPU blocks feed directly into the CPU block before heading to the radiator.
If you’re setting up multiple GPUs you can also consider if you want to set them up in parallel (water flow is cut across all video cards) or in serial (one and then the following). Given that the overall water temperature will mostly be consistent there really isn’t a major reason you should pick one of the other and I ended up choosing serial. Some people pick parallel because it reduces the amount of restriction in your loop.
Eventually you’ll have a mocked up loop diagram like mine above. The loop diagram will help you decide which fittings you need to purchase and give you a rough idea of how much tubing you need. You should have also measured things, found examples of previous work, or asked someone who owns the case to measure things to make sure everything fits. I discovered that many of my parts didn’t fit and had to go back and choose an alternative part such as a new case several times.
Later, you’ll discover that you’ve figured out almost everything and that you’re ready to share your well planned build with the community to double check your work. Create a [Build Ready] post on reddit with your parts, loop plan, and any open questions (like mine) and wait for feedback. Iterate and select different parts as needed.
5) Buy the parts
I purchased most of my components either through TITAN RIG on Amazon, Performance PCs, Aliexpress, or directly from EK and didn’t have any trouble. Pick whichever retailer you want to go through but avoid FrozenCPU since they went out of business.
If you buy through Aliexpress make sure to pick ePacket if you can as its a faster alternative for inexpensive shipping. Also, for those who are concerned about buying directly from EK I found that shipping from Slovenia was fast and the price was cheaper than buying from Performance PCs.
Now it’s just a waiting game for all your parts to get here and until then you should start preparing by doing more research to figure out how to build your loop.
6) Building the Loop
I highly recommend that you watch several Youtube videos before you begin building a loop to become familiar with the process. A picture is thousand words and a video is even better.
I’m purposely keeping this part of the guide short because JayZTwoCents has a particularly good video that explains most of the basics of building, filling, and leak testing a build. Watch that and he’ll be able to answer most of your questions.
I also have some small tips from my own experience of building my loop:
- Once you get all the parts strip most of the parts out of your case and start double checking all your measurements. Once you’re satisfied that everything will fit put in the radiators first, followed by the pump and radiator, and then the remaining parts.
- Keep the tubing slightly longer than expected as you might want to adjust things later.
- Do not over tighten compression fittings and only hand turn them until they feel sturdy.
Tips for filling, leak testing, and draining:
- When filling the loop do not overfill the funnel so that air can leave your loop while water fills it.
- Do not use too long of a length of tubing if you’re using that to fill your reservoir as it’ll slow down your fill process.
- Have lots of paper towels available especially when you’re filling your loop. I ended up having to drain my loop the first time I put it together to fix a problem.
- Slowly tilting the machine from side to side will help dislodge bubbles for filling or dislodge water for draining.
Conclusion
I’ve had a water cooled PC now for over a quarter of a year, and I’ve been very pleased with it. I’ve iterated my build heavily and found ways to reduce the pain in having to maintain and service it. It’s a pleasant journey and well worth it if you can afford it.
However, much to my dismay I finally found myself doubling what I had already spent on my PC and completely blowing past my budget. As such, I’ve concluded that water cooling isn’t something people do to save money; it’s something enthusiasts do for fun because we enjoy researching, building, and using PCs.
Good luck and have fun!
I would like to thank the /r/watercooling, Youtube, and overclockers.net community for all the resources and guidance. None of this could be possible without them!