I have been building computers ever since my uncle helped me build my first PC at age 13. The fascination of installing, tuning, and then finally using the machine has been a vice that I have been enjoying ever since. I have now built over a dozen Linux and Windows PCs over the years but the ☼perfect hackintosh☼ has always eluded me.
For those of you who don’t usually mess with the internals of computers, a hackintosh is essentially a standard commodity Windows PC running the OS X which powers MacBooks and iMacs.
Why do people go through such lengths to have OS X? It’s mostly preference, but in my case I’m doing this for my own personal education and curiosity.
Step 1) Purchasing the Right Hardware
I’ve tried building a hackintosh in the past but was always stricken by incompatibility errors that resulted in kernel crashes similar to the dread blue screen of death. The happens because Apple has complete control of the hardware and software stack, and because of that takes a lot of hardware features for granted. If your hardware isn’t exactly compatible, then you need to hack the low-level BIOS software (usually using a DSDT patch) to try to make it compatible with OS X. This is as painful as it sounds so its significantly easier just to buy the right hardware in the first place. Luckily TonyMacX86 as great guides that list out which hardware is best supported but I still needed to buy this hardware and convince myself that the project was worth the cost.
Luckily, I knew of Slickdeals and /r/buildapcsales, which led me to a great deal on a MSI Z97-Gaming 5 motherboard and Intel 4690K Core i5 processor combination that also was highly compatible for hackintoshes per the TonyMacX86 hardware guide. If you’re in the market to buy a PC, I strongly urge you to start subscribing to this subreddit for deals. I have found numerous enabling deals that provoked me to embark projects such as my foray into water cooling (which I’ll write on a post later).
In the end, I purchased the following parts to complete some of spares that I already had from my workstation. The Crucial BX100 SSD was selected because of its excellent price/performance ratio and the history of its bigger brother the MX100. I selected the older Radeon 7950 video card for my build because widely known to be compatible in hackintoshes and still provides plenty of punch for gaming (so much that it was branded as the R9 280 and is still widely sold). I highly recommend gpuShack for your video card purchase since you’ll get a great price and an awesome warranty. Lastly, the TP-Link wireless card was recommended on TonyMac for its native wireless support and having used non-native wireless USB cards I can easily attest that its well worth it.
Intel Core i5-4690K 3.5GHz Quad-Core Processor
MSI Z97-GAMING 5 ATX LGA1150 Motherboard
Crucial BX100 250GB 2.5" Solid State Drive
HIS Radeon HD 7950 3GB Video Card
TP-Link TL-WDN4800 802.11a/b/g/n PCI-Express x1 Wi-Fi Adapter
Step 2) Configuring the BIOS
You need to setup the BIOS so that it is Mac compatible. To access UEFI Setup, press and hold Delete on a USB Keyboard while the system is booting up.
Perform the following commands:
- Settings - Save & Exit - Restore Defaults.
- OC Settings - CPU Features - Disable Intel VT-d
- OC Settings - CPU Features - Disable CFG lock
- Save and exit.
Step 3) Installing the OS
For installing the Mac OS X I first followed the official guide on TonyMacX86 to create the installation USB stick. After having that, I followed the Clover guide to install everything. If you follow the instructions you shouldn’t have too much trouble.
However, in the end I had to apply the following additional fixes. Most of these fixes are distilled from this dated reddit post and forum post to which I owe a lot. Please download the following tools to get started:
- MultiBeast - Ethernet
- Clover Configurator - fixing sleep and USB 3.0
- MaciASL - HDMI audio
- Toleda audio_CloverALC (click “View Raw”) - audio
Ethernet
Launch the latest Multibeast (minimum 7.2.0) and install the following:
- Optional EFI Installed Bootloader Support
- Intel 9 Series Motherboard Support
- AtherosE2200Ethernet
Audio
To get HDMI or DisplayPort audio to work you will need to patch your DSDT with MaciASL.
Open MaciASL, go to Preferences -> iASL and change the compiler options to ACPI 5.0. Afterwards, go to Preferences > Sources and add the following URLs:
https://raw.githubusercontent.com/toleda/audio_hdmi_9series/master
http://maciasl.sourceforge.net/pjalm/repos/intel9/
Apply these patches:
- AMI-Clean_Compile-9series
- AMI-Enable_LPC-9series
- Generic Fixes
- Insert DTGP
- Insert MDHC
- Insert SMBus
Compile and save your patched DSDT with the ACPI Machine Language Binary format to /EFI/CLOVER/ACPI/patched/DSDT.aml
You may need to mount your EFI partition with Clover Configuration to be able to do this.
Unzip the Toleda audio_cloverALC script and run it in your terminal. The directions are pretty easy to follow but make sure your EFI partition is mounted.
If this doesn’t work you can also use Multibeast to install the ALC1150 kext but your audio will break with each OS X update.
Power and Sleep
Download GenericUSBXHCI.kext to copy it to your desktop. Run KextBeast to install the USB 3.0 kext.
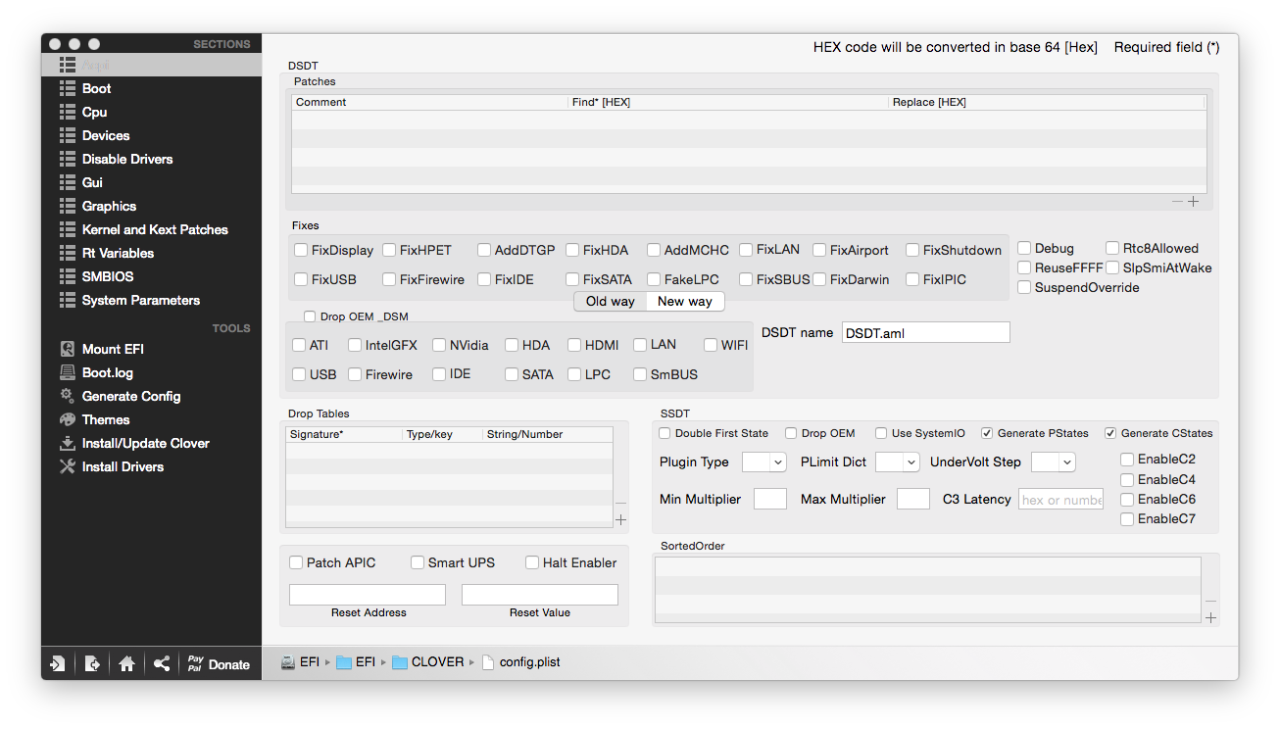
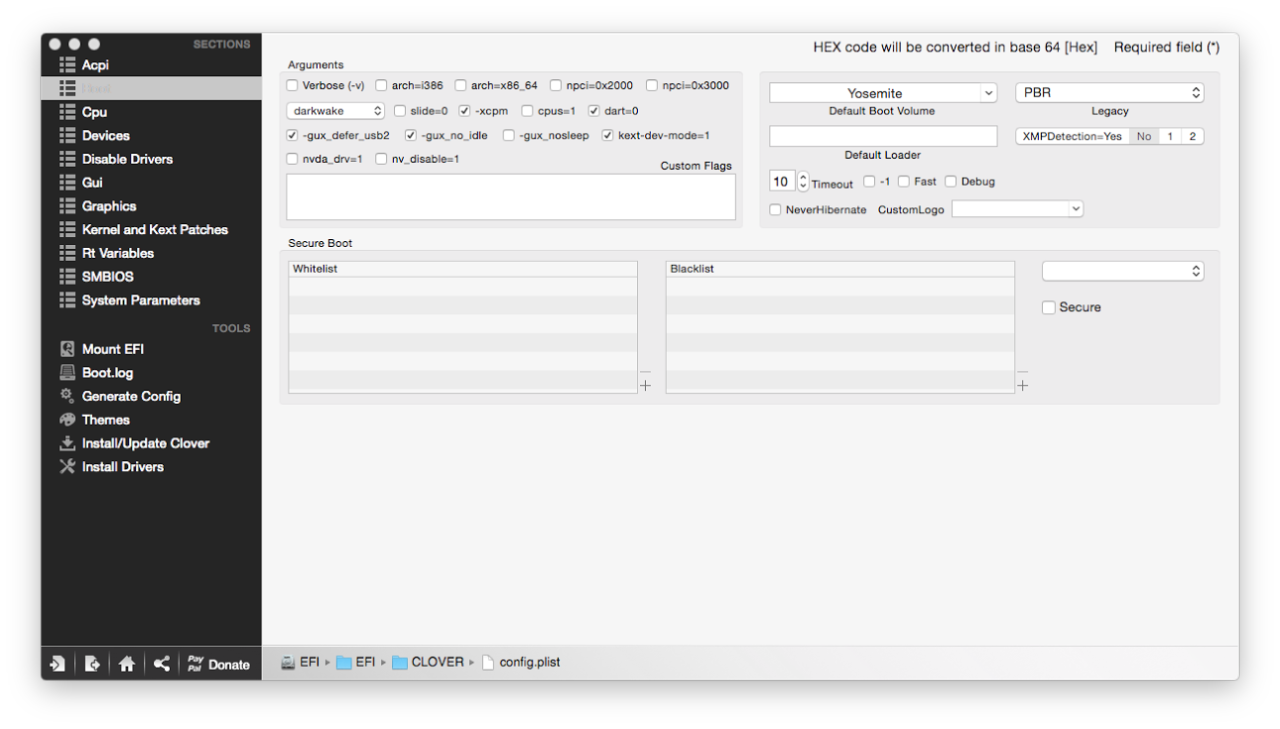
Open up Clover Configurator and load your config.plist located under EFI/Clover. Once your configuration has been loaded navigate over to the Acpi tab and check mark Generate PStates and Generate CStates
Under Boot check mark xcpm, gux_no_idle, and gux_defer_usb2
Under Devices check mark Inject and Add ClockID
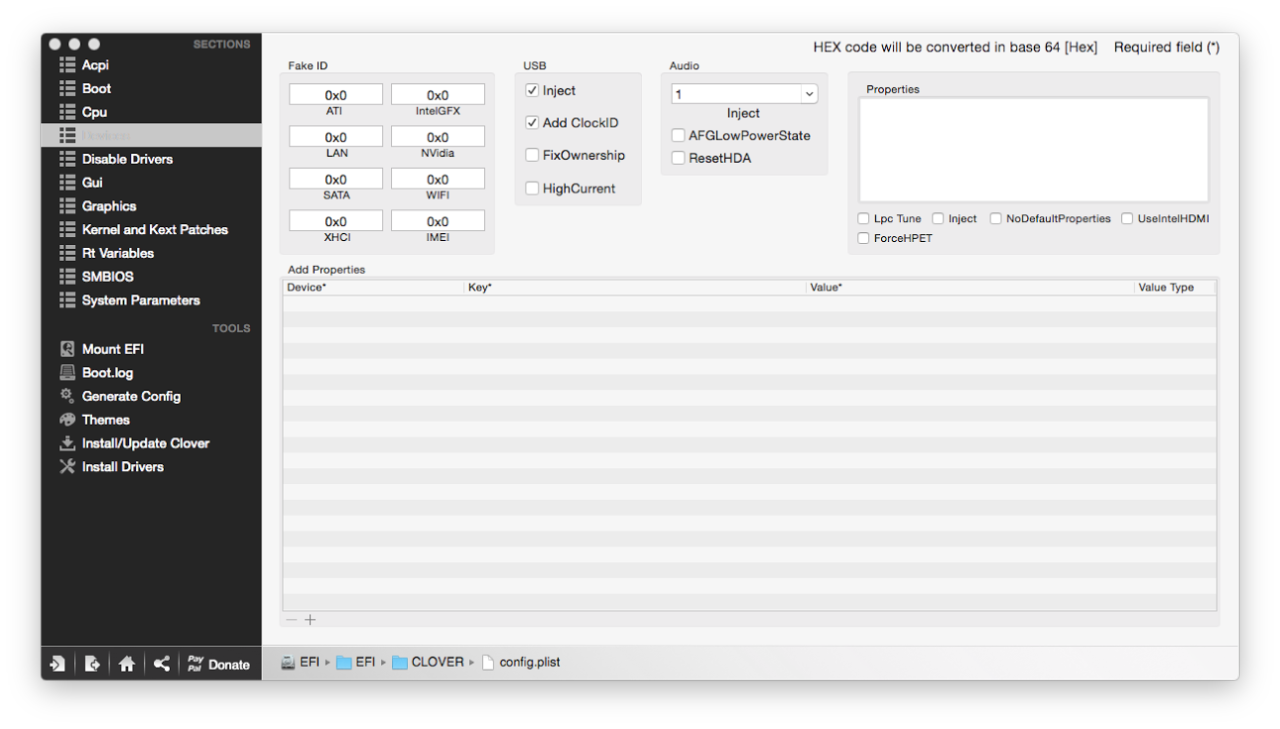
Save your configuration.
Step 4) Backup
Select a backup tool (Super Duper seems to be the current favorite) and make a backup of your hackintosh. Updates often can crash your hackintosh so its a good idea keep a backup always fresh before you try updating the OS.
Congratulations, You should have a functioning hackintosh! Let me know if you had any troubles and I’ll try my best to help :-)
Note: All of the information found here was made possible by the vibrant community of hackers and hobbyists at TonyMacX86, MacBreaker, and /r/Hackintosh. Thank you!